Saddle height is the single most important adjustment on your bike. Get it right and you ride with power, efficiency, and comfort. Get it wrong and you risk knee pain, back pain, and energy loss on every pedal stroke.
The good news is that setting your saddle height correctly takes less than ten minutes — and the difference you feel on your first ride will be immediate.
Table of Contents
- Why Saddle Height Matters
- Signs Your Saddle Height Is Wrong
- How to Measure Your Inseam
- Saddle Height Methods and Formulas
- How to Use a Saddle Height Calculator
- How to Physically Set Your Saddle Height
- Fine-Tuning by Feel
- Saddle Height for Different Bike Types
- Common Mistakes to Avoid
- FAQ
Why Saddle Height Matters
Your saddle height determines the angle of your knee at the bottom of the pedal stroke. This single measurement affects:
- Power output — At the correct height, your leg reaches near-full extension at the bottom of the stroke, allowing the major muscle groups (quads, glutes, hamstrings) to work through their full range of motion. Too low and you lose power. Too high and you rock your hips, wasting energy.
- Injury prevention — The majority of cycling knee injuries are directly linked to incorrect saddle height. A saddle that is too low causes anterior knee pain (front of the knee). Too high causes posterior knee pain (back of the knee) and IT band issues.
- Comfort on long rides — A correctly set saddle reduces fatigue and allows you to sustain effort for longer without discomfort.
- Pedalling efficiency — When your leg is at the right angle, you recruit the correct muscles in the correct sequence. A poorly set saddle forces compensations that tire you out faster.
Professional bike fitters consider saddle height the foundation of every bike fit — everything else is adjusted around it.
Signs Your Saddle Height Is Wrong
Before you measure anything, check whether you recognise any of these symptoms:
Saddle Too Low
- Pain or aching at the front of the knee (patella)
- Feeling of pushing down rather than spinning through the pedal stroke
- Thighs burning quickly even at low effort
- Knees rising above hip level at the top of the stroke
- You feel cramped or compressed on the bike
Saddle Too High
- Rocking hips from side to side while pedalling (visible from behind)
- Pain or tightness behind the knee
- Numbness or tingling in the feet
- Having to point toes down to reach the bottom of the stroke
- Lower back pain after longer rides
Saddle at the Right Height
- Smooth, circular pedal stroke
- Slight bend in the knee at the bottom of the stroke (not fully locked out)
- Hips stable and level
- Power feels natural and sustainable
- No knee or lower back pain
How to Measure Your Inseam
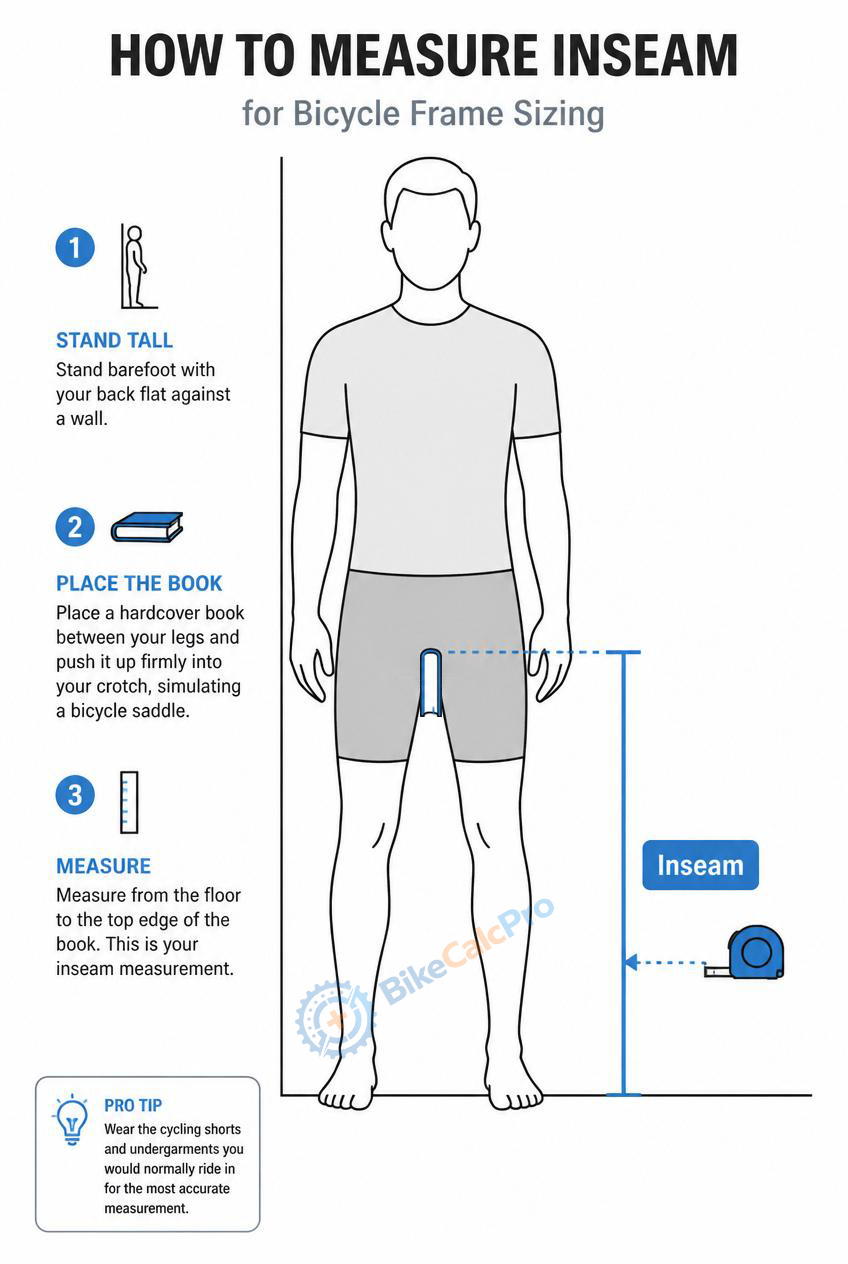
All saddle height formulas start with your inseam measurement. This is not your trouser inseam — it is your cycling inseam, measured barefoot against a wall.
What You Need
- A hardback book or a thin wooden board
- A tape measure or ruler
- A pencil
- A smooth wall
Step-by-Step
- Remove your shoes and stand with your feet approximately 15–20 cm apart
- Place the book between your legs, spine upward, and press it firmly against your pubic bone — mirroring the pressure of a saddle
- Stand straight against the wall, looking forward
- Mark the wall at the top of the book spine with a pencil
- Measure from the floor to the pencil mark in centimetres
- Repeat twice and take the average — small variations between measurements are normal
Tip: It helps to have someone assist you with this measurement. Doing it alone often results in slight errors from leaning or shifting weight.
Write this number down. It is the input you will use in every saddle height formula and in the calculator.
Saddle Height Methods and Formulas
There are several established methods for calculating saddle height. Each has its strengths, and the right one for you may depend on your riding style and experience level.
Method 1: The LeMond Formula (Most Widely Used)
Developed by three-time Tour de France winner Greg LeMond, this is the most commonly referenced formula in cycling:
Saddle height = Inseam (cm) × 0.883
The result is measured from the centre of the bottom bracket to the top of the saddle, along the seat tube.
Example: Inseam of 82 cm → 82 × 0.883 = 72.4 cm
This formula works well for road cyclists with a standard pedalling style and works best with cleated road cycling shoes.
Method 2: The Holmes Method (Knee Angle)
This method uses a goniometer (angle measuring tool) or a video analysis app to measure the actual angle of your knee at the bottom of the pedal stroke.
Target knee angle: 25–35 degrees
- Below 25° → saddle is too low
- Above 35° → saddle is too high
- 30° is considered the sweet spot for most riders
This is the method professional bike fitters use because it accounts for individual differences in anatomy — femur length, hip flexibility, and foot position — rather than relying on a single formula.
Method 3: The Heel-to-Pedal Method (Quick Field Check)
This is a fast, no-tools method for a rough starting position:
- Sit on the bike on a trainer or lean against a wall
- Place your heel on the pedal (not the ball of your foot)
- Pedal backwards
- Your leg should reach full extension at the bottom of the stroke with no hip rocking
Once your heel is straight at the bottom, the correct saddle height with your foot in the normal position (ball of foot over pedal axle) will give you the slight bend that is ideal for pedalling.
Method 4: The Hamley Formula
An older method, less commonly used today but still referenced:
Saddle height = Inseam (cm) × 1.09
This produces a slightly higher saddle position than the LeMond formula and is sometimes preferred by time trialists and riders with a more aggressive position.
Which Method Should You Use?
| Method | Best For | Accuracy |
|---|---|---|
| LeMond (×0.883) | Road cyclists, general use | Good starting point |
| Holmes (knee angle) | All riders, professional fitting | Most accurate |
| Heel-to-Pedal | Quick check, beginners | Rough estimate only |
| Hamley (×1.09) | TT riders, aggressive position | Good for specific styles |
Start with the LeMond formula, then verify with the heel-to-pedal check, and fine-tune by feel over 2–3 rides.
How to Use a Saddle Height Calculator
Formulas are useful, but a calculator gives you a precise result instantly — and accounts for variables like shoe stack height and crank length.
Our Saddle Height Calculator uses your inseam measurement to calculate:
- Recommended saddle height in centimetres
- The measurement reference point (bottom bracket to saddle top)
- Adjustments for different riding styles (road, MTB, commuter)
How to get the most accurate result:
- Use your barefoot inseam measurement (as measured above)
- If you ride with cycling shoes, add the stack height of your shoe sole (typically 10–15 mm for road shoes, 20–25 mm for MTB shoes) — the calculator accounts for this
- Enter your crank length if you know it (standard is 170–175 mm for most adult bikes)
The calculator gives you a starting number. From there, fine-tuning by feel is still important — no formula replaces riding feedback.
How to Physically Set Your Saddle Height
What You Need
- A hex key (Allen key) set — most seat posts use 4mm or 5mm
- A tape measure
- A marker or tape to mark your starting position
- A bike trainer or assistant to hold the bike steady (helpful but not essential)
Step-by-Step
- Calculate your target height using the formula or calculator above
- Measure from the centre of the bottom bracket (the axle at the centre of the cranks) to the top of the saddle, along the seat tube — not in a straight vertical line
- Loosen the seat post clamp with the appropriate hex key — just enough to allow movement, not fully loose
- Adjust the saddle up or down until the measurement matches your target
- Tighten the clamp to the manufacturer’s torque specification (usually 5–7 Nm for aluminium posts, 4–5 Nm for carbon)
- Check the saddle is level — a tilted saddle causes pressure problems and forces compensatory movements
- Mark your position with a small piece of tape or a marker line at the seat post — useful if the saddle ever slips or you remove it for travel
Carbon seat posts: Never over-tighten. Use a torque wrench and apply carbon assembly paste (carbon grip compound) to prevent slipping at lower torque values.
Checking Your Position on the Bike
After setting the height, sit on the bike in your normal riding position (on a trainer is ideal):
- Place the ball of your foot over the pedal axle — not your heel, not your arch
- Pedal through a full revolution
- At the bottom of the stroke, your knee should have a slight bend — approximately 25–35 degrees
- Your hips should not rock — if they do, lower the saddle by 3–5 mm increments until they stop
Fine-Tuning by Feel
No formula is perfect for every body. After setting your initial height, ride for 2–3 sessions before making further adjustments. Changes take time to feel natural.
Adjustment Protocol
Make changes in 3–5 mm increments only. Larger changes confuse your body and make it harder to assess the effect.
| What You Feel | Adjustment |
|---|---|
| Front knee pain (patella) | Raise saddle 3–5 mm |
| Back of knee pain | Lower saddle 3–5 mm |
| Hip rocking | Lower saddle 3–5 mm |
| Feeling cramped / compressed | Raise saddle 3–5 mm |
| Foot going numb | Check cleat position first, then saddle height |
| Lower back pain | Check saddle tilt and handlebar height |
Important: If you experience persistent pain, stop riding and consult a professional bike fitter or sports physiotherapist. Pain is a signal, not something to ride through.
Saddle Height for Different Bike Types
The same inseam measurement produces slightly different saddle heights depending on your bike type and riding position.
Road Bike
Use the LeMond formula (×0.883) as your starting point. Road cyclists typically run the highest saddle positions because efficiency and power output are the priority, and the drop handlebars allow for a more stretched, aerodynamic position.
Mountain Bike
MTB saddle height for trail and enduro riding is usually set 5–10% lower than road position. You need to be able to drop your heels, shift your weight back on descents, and move freely around the bike. Many MTB riders use a dropper post — a remote-activated post that lowers the saddle for descents and raises it for climbs at the press of a lever.
For XC (cross-country) racing, saddle height is closer to road bike position because the focus is on pedalling efficiency.
Gravel Bike
Gravel positions fall between road and MTB. A starting point of inseam × 0.875 is often recommended — slightly lower than pure road to allow more movement and stability on mixed terrain.
Hybrid and Commuter Bike
Comfort is the priority here. A slightly lower saddle (allowing a gentle knee bend but with both feet able to touch the ground with the ball of the foot) is acceptable for urban riding where frequent stops are needed.
Indoor Cycling / Spin Bike
Spin bikes use a different measurement system (numbered posts rather than centimetres). The heel-to-pedal method works well here — set the saddle so your leg is fully extended with your heel on the pedal, then ride with the ball of your foot in normal position.
FAQ
How do I know if my saddle height is correct?
The clearest sign of a correct saddle height is a slight bend in the knee (25–35 degrees) at the bottom of the pedal stroke, stable hips, and the absence of knee or lower back pain. Use our [Saddle Height Calculator](https://bikecalcpro.eu/saddle-height-calculator/) to find your starting position.
What is the LeMond formula for saddle height?
The LeMond formula multiplies your barefoot inseam measurement (in centimetres) by 0.883. The result is the distance from the centre of the bottom bracket to the top of the saddle, measured along the seat tube.
Can a wrong saddle height cause knee pain?
Yes — it is one of the most common causes of cycling knee pain. A saddle that is too low causes pain at the front of the knee (patella tendon). A saddle that is too high causes pain behind the knee and can lead to IT band issues. Correcting saddle height often resolves these issues quickly.
Should my feet touch the ground when sitting on the saddle?
On a correctly set road or performance bike, you should not be able to place your flat foot on the ground while seated. You should only be able to touch with your toes. If you can place both feet flat, your saddle is likely too low.
Does saddle height change for clipless pedals?
Yes. Clipless pedals and cycling shoes have a higher stack height (the distance from the pedal axle to the bottom of your foot) than flat pedals and trainers. When switching to clipless, you may need to lower your saddle by 5–10 mm depending on the shoe and pedal combination.
How often should I check my saddle height?
Check your saddle height whenever you change shoes, pedals, or saddle. Also check periodically if you take a long break from riding or if you notice any new discomfort. For regular riders, a seasonal check is a good habit.## FAQ {#faq}
Common Saddle Height Mistakes to Avoid
Mistake 1: Measuring in a Straight Vertical Line
Saddle height is always measured along the seat tube, not vertically from the floor. On bikes with angled seat tubes (common on road bikes), these measurements are meaningfully different.
Mistake 2: Setting It and Forgetting It
Your optimal saddle height can change over time — as your flexibility improves, as you change shoes, or as you switch to different pedal systems (flat pedals vs clipless have different stack heights). Check your position periodically, especially after any equipment change.
Mistake 3: Ignoring Saddle Tilt
A saddle tilted nose-down causes you to slide forward constantly, putting pressure on your arms and wrists. A saddle tilted nose-up puts pressure on soft tissue. Start level and adjust by 1–2 degrees at most.
Mistake 4: Making Large Adjustments at Once
Changes of more than 5 mm at a time make it very difficult to assess the effect. Your muscles and tendons need time to adapt. Small, incremental changes are always better.
Mistake 5: Copying Someone Else’s Measurement
Saddle height is personal. Two riders with the same inseam but different femur-to-tibia ratios, hip flexibility, or foot arch will need different saddle heights. Use your own measurements as your starting point.
Summary
Saddle height is the foundation of a good bike fit. The steps are simple:
- Measure your barefoot inseam accurately
- Use the LeMond formula (×0.883) as your starting point
- Verify with the heel-to-pedal check
- Fine-tune in 3–5 mm increments over 2–3 rides
- Listen to your body — pain is always a signal to adjust
Ready to find your exact number? Use our Saddle Height Calculator →