
Saddle Height Calculator
Recommended Saddle Height
/
Calculate the optimal saddle height for your bicycle based on your body measurements
Getting your saddle height right is one of the most impactful adjustments you can make on a bike. Even a difference of 5 mm can affect your power output, comfort, and risk of knee injury. Use the measurements below to get the most accurate result from the calculator.
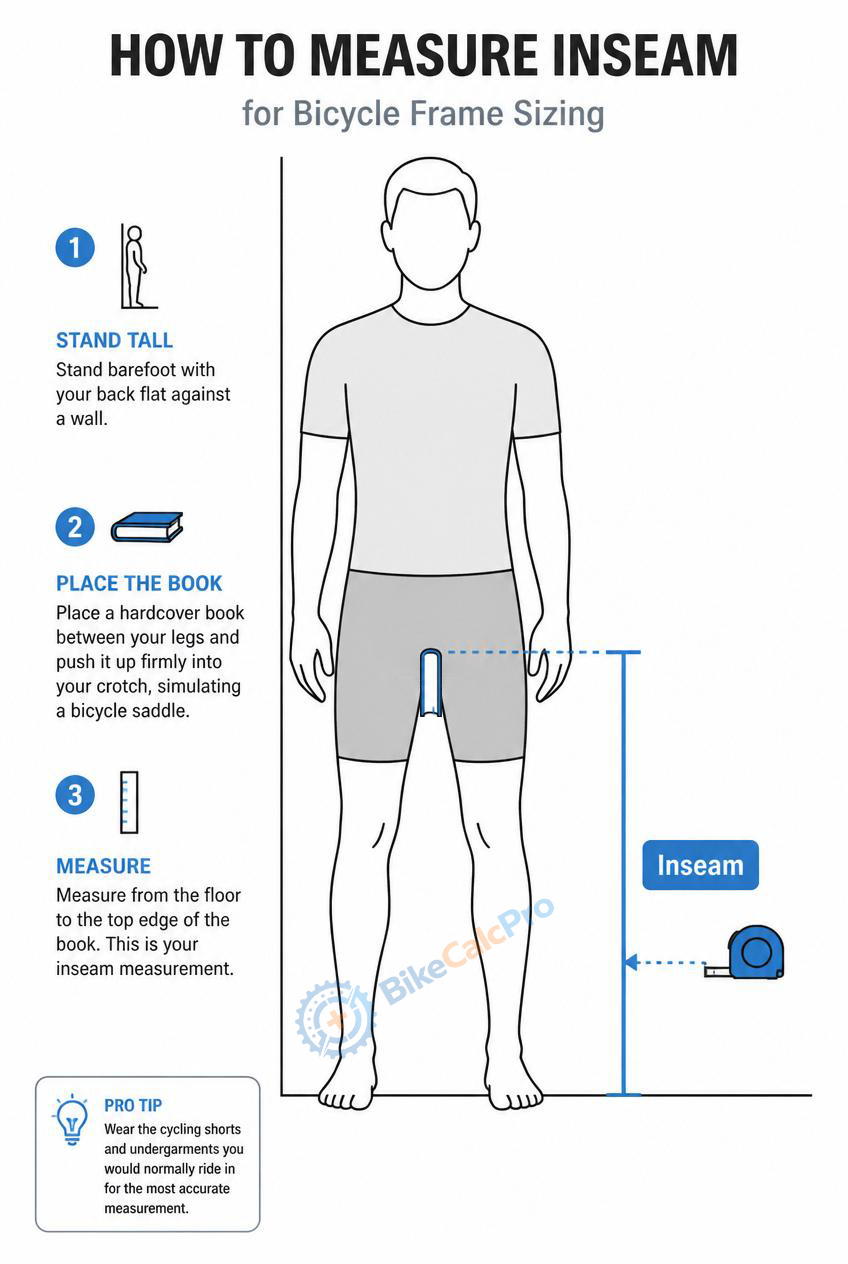
What you need: a hardcover book, a tape measure, and a wall.
Stand barefoot with your back flat against the wall, feet about 15 cm apart.
Place the book firmly between your legs, spine upward, pressed against your crotch as a bike saddle would be.
Mark the wall at the top of the book spine, then measure from the floor to that mark.
That is your inseam length.
Tip: Wear your cycling shorts when measuring — the padding adds a few millimetres that matter at this level of precision.
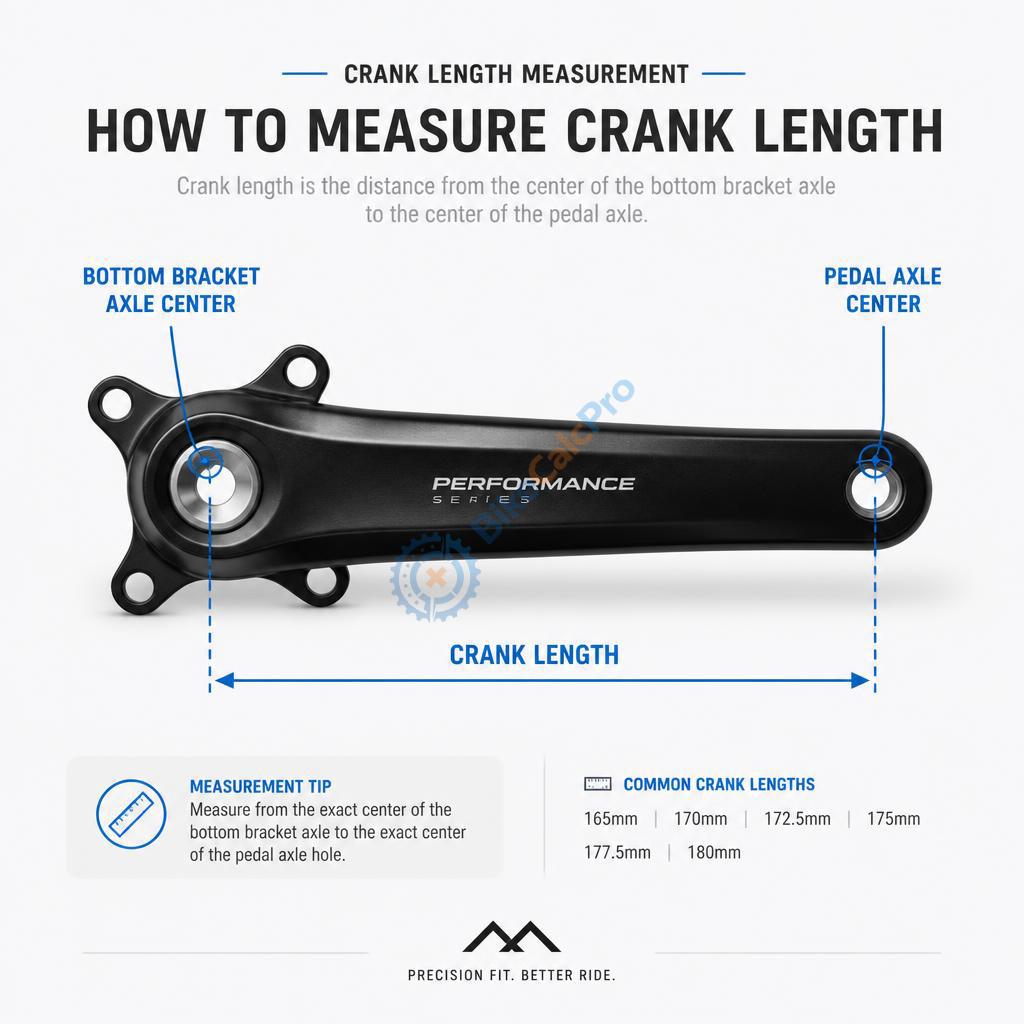
The crank arm is the lever that connects the pedal to the bottom bracket spindle. Crank length is measured from the center of the bottom bracket axle to the center of the pedal axle hole at the opposite end of the crank arm. On most cranks this value is stamped or engraved on the back of the crank arm — look for a number like 170, 172.5, or 175.
If you cannot find the marking, measure directly with a ruler or calliper. Standard sizes for adult bikes range from 165 mm to 175 mm, with 172.5 mm being the most common.
The calculator uses the LeMond method as its base formula: your inseam length multiplied by a riding-style factor between 0.880 and 0.895. Road racing uses the highest multiplier (0.895) for maximum power transfer in an aerodynamic position. Mountain biking uses the lowest (0.880) to allow more hip movement and control on technical terrain.
A crank length correction is then applied: for every millimetre your crank deviates from the 172.5 mm reference, the saddle height shifts by half that amount. Longer cranks effectively lower the saddle relative to the pedal stroke, so the result is adjusted upward to compensate — and vice versa for shorter cranks.
The calculated value is a starting point, not a final answer. Adjust in 2–3 mm increments and allow at least one week of riding before making further changes. Saddle too high: your hips rock side to side, and you have to stretch at the bottom of the pedal stroke. Saddle too low: knee pain at the front of the knee, reduced power, and fatigue in the quads.
Take a rider with an 84 cm inseam on a road bike. The LeMond method gives 84 × 0.895 ≈ 75.2 cm saddle height. If that same rider instead estimates "close enough" and sets the saddle at 74 cm — just over 1 cm low — the knee never fully extends at the bottom of the pedal stroke. Over a single long ride this might just feel slightly inefficient, but over weeks of training at that height, the repeated extra flexion loads the patellar tendon on every single pedal stroke, which is exactly the mechanism behind anterior knee pain that develops gradually rather than from a single incident.
Go 1 cm too high instead — 76.2 cm — and the opposite problem appears: the hip rocks side to side to complete each stroke, which not only wastes power through lateral movement instead of forward propulsion, but also strains the IT band on the outside of the knee. Many riders mistake this rocking for a saddle width or fit issue, when the actual cause is height.
The crank length correction matters just as much: switching from a 172.5 mm crank to a 165 mm crank — increasingly common for shorter riders or those optimising aerodynamics — shifts the effective saddle height by roughly 3.75 mm. Skipping this correction on a crank swap is one of the most common reasons riders feel "off" after upgrading components, despite using the same inseam measurement as before.
Yes — it is one of the most common causes of cycling-related knee pain. A saddle set too low forces your knee into excessive flexion throughout the pedal stroke, loading the patellar tendon and causing pain at the front of the knee. A saddle set too high causes your hip to drop on each downstroke, which strains the IT band and produces pain on the outside of the knee. Getting saddle height within 2–3 mm of the calculated value eliminates most of these issues.
Start at the lower of the two values. It is easier and safer to raise the saddle progressively than to ride too high. Set the saddle, ride for a week, then assess: if you feel restricted and lack power at the bottom of the stroke, raise it by 2 mm and repeat. Never raise the saddle more than 3 mm per adjustment session.
Once dialled in, saddle height rarely needs to change unless your body changes — for example, if you lose or gain significant weight, change your cycling shoes or cleat stack height, or switch to a different crank length. Young riders who are still growing should recheck every few months. Any time you get a new bike or swap the seatpost, recalculate from scratch.
Yes. The LeMond method is based on your leg length and pedal stroke geometry, which is identical on an e-bike. The motor assistance does not change your biomechanics. The only exception is step-through e-bikes with a very low standover height — in that case confirm that the minimum seatpost insertion mark remains inside the frame after setting the calculated height.
⚠️️ Note: This calculator provides a starting estimate based on established bike fitting methods. Individual anatomy, flexibility, and riding position vary — results should be used as a starting point only. For a precise fit, consult a certified bike fitter.


