“Chain stretch” is one of the most misunderstood terms in cycling maintenance. The chain does not actually stretch in the way a rubber band does — the metal links and pins wear at a microscopic level, and that accumulated wear changes the effective length of the chain over thousands of kilometres. Left unchecked, this single worn part can quietly destroy a far more expensive cassette and chainrings.
This guide explains what chain wear actually is, exactly how to measure it at home with simple tools, and when the numbers tell you it is time to replace your chain.
Table of Contents
- What Is Chain Wear (Chain “Stretch”)?
- Why Chain Wear Matters So Much
- Tools for Checking Chain Wear
- How to Check Chain Wear With a Wear Indicator Tool
- How to Check Chain Wear With a Ruler
- Understanding the Wear Percentage Thresholds
- How Often Should You Check Chain Wear?
- What Happens If You Ignore Chain Wear
- Extending Chain Life
- Common Mistakes to Avoid
- FAQ
What Is Chain Wear (Chain “Stretch”)?
Despite the common name, a chain does not stretch in the literal sense of the metal elongating. What actually happens is wear at the pins and bushings that connect each link — the microscopic metal-on-metal contact points that flex with every single pedal stroke.
Over thousands of kilometres, this wear accumulates at each connection point. Multiplied across the dozens of links in a full chain, these tiny amounts of wear add up to a measurable increase in the chain’s overall effective length — which is why the result is described as “stretch,” even though the cause is wear, not elongation of the metal itself.
A new chain has precisely spaced links, engineered to mesh perfectly with the teeth of your chainrings and cassette cogs. As wear accumulates, this precise spacing degrades, and the chain begins to sit slightly differently on the teeth of your chainrings and cassette than it did when new.
Why Chain Wear Matters So Much
A worn chain does not just affect the chain itself — it actively damages the more expensive components it interacts with.
The Cascading Cost Problem
As a chain wears, its links no longer mesh precisely with chainring and cassette teeth. Instead of distributing load evenly across the contact points the teeth were designed for, a worn chain forces contact at slightly different points, gradually reshaping the teeth themselves — a process often described as “shark-fin” wear on severely affected cogs.
This means:
- Replacing a chain at the right time (0.5–0.75% wear) typically costs only the price of a new chain
- Ignoring chain wear until 1%+ often means the cassette has also been damaged, and sometimes the chainrings too, turning a modest chain replacement into a significantly more expensive multi-component replacement
Performance Effects
Beyond the cost implications, a worn chain causes:
- Imprecise shifting that does not improve with derailleur adjustment
- Chain skipping under load, particularly when climbing or sprinting
- Increased noise from the drivetrain
- Higher risk of chain failure under load, in rare but serious cases
Tools for Checking Chain Wear
Dedicated Chain Wear Indicator Tool
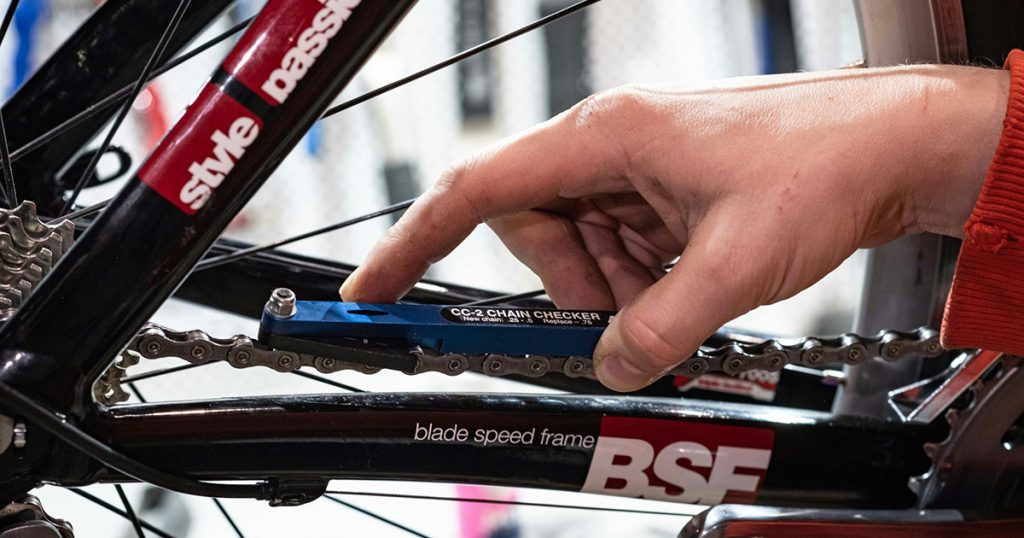
The most convenient and reliable option. These small tools (made by Park Tool, Shimano, and others) have a gauge that drops into the chain links at a calibrated depth corresponding to a specific wear percentage. A simple go/no-go reading tells you immediately whether replacement is needed.
Ruler or Tape Measure
A free alternative that requires more careful measurement but works accurately if done correctly. This method is detailed step by step below.
Chain Checker Apps and Digital Calipers
Less common but available for riders who want more granular wear percentage tracking over time, useful for those who want to log wear progression rather than just get a pass/fail result.
How to Check Chain Wear With a Wear Indicator Tool
Step-by-Step
- Shift to a middle gear to create slight chain tension and stabilise the chain for measurement
- Hold the wear indicator tool over the chain, aligning the two pins or hooks with chain links as instructed for your specific tool model
- Press the tool down gently into the chain
- Read the result: most tools have markings for 0.5% or 0.75% wear — if the tool’s gauge drops into the chain at the marked point, the chain has reached that wear level
- Check at multiple points along the chain — wear is not always perfectly even, so checking 2–3 sections gives a more reliable overall picture
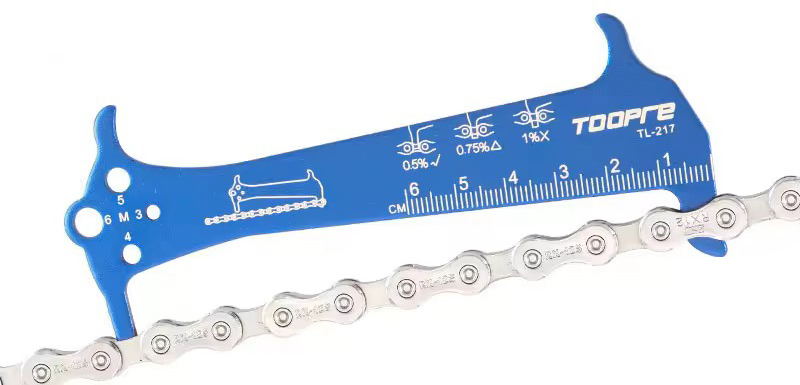
Tip: Many wear tools have a “0.5” side and a “0.75” or “1.0” side. If the 0.5 side drops in but the 0.75 side does not, your chain is in the 0.5–0.75% wear range — worth planning a replacement soon but not an emergency.
How to Check Chain Wear With a Ruler
This free method requires more precision than using a dedicated tool, but is perfectly reliable when done carefully.
What You Need
- A standard ruler or tape measure with clear millimetre or 1/16-inch markings
- Good lighting to see the pin centres clearly
Step-by-Step
- Shift to a middle gear and find a section of chain that is easy to access, ideally along the bottom of the chainstay
- Align the “0” mark of your ruler precisely with the centre of a chain pin
- Count along exactly 12 complete links (24 inches on a new, unworn chain) — count the same type of link each time (either all inner links or all outer links) for consistency
- Read the measurement at the centre of the pin at link 12
- Compare to the reference values below
Reference Values (Measuring 12 Links / 24 Inches New)
| Measurement at 12 Links | Wear Percentage | Action |
|---|---|---|
| 24 inches (exactly) | 0% | New chain, no wear |
| 24 1/16 inches | 0.5% | Plan replacement soon |
| 24 1/8 inches | 1.0% | Replace immediately |
Metric equivalent: A new chain measures 304.8 mm over 12 links. At 0.5% wear, this becomes approximately 306.3 mm. At 1% wear, approximately 307.8 mm.
Understanding the Wear Percentage Thresholds
0% – 0.5% Wear: Healthy
Your chain is in good condition. No action needed, but continue regular checks as part of routine maintenance.
0.5% – 0.75% Wear: Plan for Replacement
This is the ideal window to replace your chain. At this stage, wear has not yet progressed far enough to have caused significant damage to your cassette or chainrings, meaning a simple chain swap should restore smooth performance.
0.75% – 1.0% Wear: Replace Now
Beyond this point, risk of cassette and chainring damage increases substantially. Replace the chain as soon as practical, and inspect the cassette and chainrings carefully when you do, checking for visible wear patterns (hooked or “shark-fin” shaped teeth) that would indicate those components also need replacement.
Beyond 1.0% Wear: Replace Immediately, Expect Cassette/Chainring Wear
At this level of wear, it is common to find that the cassette (and sometimes chainrings) have also been damaged by the prolonged mismatch between worn chain spacing and the original tooth profile. A new chain on a significantly worn cassette may skip or shift poorly even though the chain itself is new — a sign the cassette needs replacing too.
Why thresholds differ slightly by drivetrain: Some manufacturers (particularly for narrower 11 and 12-speed chains) recommend slightly tighter thresholds, such as replacing at 0.5% rather than waiting until 0.75%, since narrower chains and their corresponding components have less tolerance for wear-related mismatch. Check your specific groupset manufacturer’s guidance if available.
How Often Should You Check Chain Wear?
| Riding Frequency/Conditions | Recommended Check Interval |
|---|---|
| Regular road riding, dry conditions | Every 1,500–2,500 km |
| Regular MTB/gravel riding, mixed conditions | Every 800–1,500 km |
| Frequent wet or muddy riding | Every 500–800 km |
| Daily commuting, all weather | Monthly, regardless of distance |
Chain wear accumulates faster in wet, muddy, or gritty conditions because contamination accelerates the microscopic wear at the pins and bushings, even with regular cleaning and lubrication. Riders in consistently poor conditions should check more frequently than the general guidelines above suggest.
What Happens If You Ignore Chain Wear
Cassette Damage
A worn chain forces uneven load distribution onto the cassette teeth, gradually reshaping them. This shows up as a distinctive hooked or “shark-fin” profile, visible on close inspection, particularly on the most frequently used cogs.
Chainring Damage
The same mechanism affects chainring teeth, though typically at a slower rate than the cassette, since chainring teeth are engaged less frequently per pedal revolution than any single cassette cog.
Poor Shifting That Does Not Resolve With Adjustment
If shifting problems persist despite careful derailleur adjustment, worn chain (and resulting cassette wear) is one of the most common underlying causes that adjustment alone cannot fix.
Chain Skipping Under Load
A severely worn chain can skip over cassette teeth when significant force is applied, such as climbing out of the saddle or sprinting — a safety concern as well as a performance one, since unexpected skipping under heavy load can cause loss of balance.
The Replacement Cost Cascade
The financial argument for timely replacement is straightforward: a chain alone costs a fraction of a chain, cassette, and chainring replacement combined. Catching wear at the 0.5–0.75% stage consistently saves money over the life of a bike compared to riding chains until they fail or cause secondary damage.
Extending Chain Life
Regular Cleaning
Removing grit and grime reduces the abrasive wear that accelerates pin and bushing degradation. A simple degreaser and rinse, followed by thorough drying, done regularly, meaningfully extends chain life.
Appropriate Lubrication
Using a lubricant suited to your riding conditions (wet lube for wet/muddy conditions, dry lube for dry/dusty conditions) reduces friction and contamination buildup more effectively than a one-size-fits-all approach.
Avoiding Cross-Chaining
Running the chain at extreme angles (largest chainring with largest cassette cog, or smallest with smallest) accelerates wear due to the increased lateral stress on the chain. Choosing straighter chainline gear combinations where practical extends chain life.
Rotating Multiple Chains
Some riders maintain two or three chains, rotating them every few hundred kilometres. Because chain wear is partly a function of total revolutions independent of cassette wear, rotating chains in this way distributes wear more evenly and can extend the combined lifespan of chain and cassette compared to wearing a single chain continuously to its replacement point.
Common Chain Wear Mistakes to Avoid
Mistake 1: Only Checking When Something Feels Wrong
By the time wear is noticeable through shifting problems or noise, you have often already passed the ideal replacement window and may have caused secondary cassette damage. Regular proactive checks catch wear before it becomes a problem.
Mistake 2: Measuring at Only One Point on the Chain
Wear is not always perfectly even along the chain’s length. Checking only one section can give a misleadingly optimistic reading if that particular section happens to be less worn than the rest.
Mistake 3: Installing a New Chain on a Worn Cassette Without Checking
If your chain has reached 1%+ wear, the cassette has likely sustained some wear too. Installing a fresh chain without inspecting the cassette can result in continued poor shifting despite the new chain, leading to confusion about whether the new chain is “broken” when the actual issue is the cassette.
Mistake 4: Ignoring Manufacturer-Specific Guidance
Some chain and groupset manufacturers recommend tighter wear thresholds, particularly for narrow, high-speed-count chains (12-speed). Defaulting to the general 0.75% threshold for all chains may mean replacing narrower chains slightly later than ideal.
Mistake 5: Assuming a More Expensive Chain Lasts Proportionally Longer
While higher-end chains often have better coatings and slightly improved wear resistance, the difference is not always dramatic, and maintenance habits (cleaning, lubrication, avoiding cross-chaining) typically have a bigger impact on chain longevity than price point alone.
FAQ
How do I check if my bike chain is worn?
Use a chain wear indicator tool for the quickest check, or measure 12 complete links with a ruler — a new chain measures exactly 24 inches over this span. If the measurement exceeds 24 1/16 inches, the chain has reached 0.5% wear and should be considered for replacement soon.
What does 0.5% chain wear mean?
It means the chain’s effective length has increased by 0.5% due to accumulated wear at the pins and bushings, measurable as the chain measuring slightly longer than its original length over a fixed number of links. This is the recommended point to plan chain replacement, before more significant cassette damage occurs.
Can a worn chain damage my cassette?
Yes. A worn chain no longer meshes precisely with cassette teeth, gradually reshaping them through uneven load distribution. This is one of the main reasons timely chain replacement is recommended — it protects the more expensive cassette and chainrings from premature wear.
How often should I replace my bike chain?
There is no fixed mileage that applies to every rider, since wear depends heavily on riding conditions, mileage, and maintenance habits. Check chain wear regularly with a gauge or ruler rather than relying on distance alone, and replace at the 0.5–0.75% wear threshold.
Does a new chain fix poor shifting?
Sometimes, but not always. If the cassette has also been damaged by riding on a significantly worn chain, installing a new chain alone may not resolve shifting issues, since the new chain will not mesh correctly with already-reshaped cassette teeth. Inspect the cassette when replacing a heavily worn chain.
Is chain wear the same as chain length?
No, these are different concepts. Chain wear refers to the gradual degradation at the pins and bushings that effectively lengthens the chain over time through use. Chain length refers to the total number of links needed for your specific chainring and cassette combination when installing a new chain. Use our Chain Length Calculator to determine the correct length for a replacement chain.
Summary
Chain wear is a gradual, measurable process that — if caught early — costs little to fix, but can become expensive if ignored.
Key takeaways:
- “Chain stretch” is actually wear at the pins and bushings, not literal stretching
- Check with a wear indicator tool or a ruler measuring 12 links (24 inches new)
- Replace at 0.5–0.75% wear to avoid cassette and chainring damage
- Check more frequently in wet, muddy, or gritty riding conditions
- Regular cleaning and appropriate lubrication meaningfully extend chain life
Need to size a replacement chain correctly? Use our Chain Length Calculator →